Monday, July 26, 2010

Mom - A.K.A. Pack Mule

Tomorrow the kids and I are leaving for NY to visit with some family I haven't seen in a VERY VERY long time. Kevin is staying home to take care of the dogs and chickens and most importantly, keep the bacon coming in.

I don't mind traveling alone, but tomorrow is going to offer a new challenge for me. Getting to, parking and getting inside of the airport - BY MYSELF! I have packed lightly but can't go much lighter than this:
- One large rolling suitcase with all our clothes
- One backpack that will act as diaper bag, toy carrier, camera case and lunch box
- One baby in ergo (I love you ergo carrier)
- One toddler (hopefully) in car seat strapped to a Go-Go Babyz - fingers crossed that he loves it as much tomorrow as he did today racing around the kitchen in it.
- Two blankies and two sippy cups

I am thinking I will look something like this walking to the airport check-in.
If I can actually make it inside of the airport I will feel like a super star. The tricky part is getting the baby out of the car seat and then taking out that same car seat to attach it to the stroller do-hicky and then getting Little Boy to sit in it. Strap on baby and back pack, and hope I can roll stroller and suitcase at the same time. I am hoping once I make it to the actual gate I will find some sympathetic passenger that will take pity on me and offer a hand in getting the car seat installed (fingers crossed again).

Did I mention that all this will be done at 4:00 am????
Driving cross country is starting to look more appealing by the minute.

Wish me luck!

Friday, July 23, 2010

Cocktails & Crafts - Blueberry Jam and Passion Tea Lemonade!


Blueberry Jam and Passion Tea Lemonade!
King Soopers had a huge sale on blueberries so it would be silly not to make some jam!

We opted to make the jam without using pectin. When you don't use pectin you have to boil the fruit longer for it to jell and you end up with a bit less jam, I have heard the advantage is that it should last for over a year without the pectin. If anyone knows anything else about using pectin I would love to learn more.

The cocktail was  Passion Tea Lemonade.
  • 4oz Bacardi Rum
  • 3/4 Cup Lemonade
  • 2 cups Tazo Passion Tea   
This made three very refreshing drinks.

To make blueberry jam you will need:
  • 4 1/2 cups of blueberries
  • 2 1/3 cups of sugar
  • Mason jars and lids
  • Wide mouth funnel
  • Heat
  • Tongs to grab jars out of hot water


1. Add berries to a large stock pot that won't over flow.
2. Add sugar
3. Turn on heat
4. Stir often so it doesn't burn to the bottom of the pot.


5. To test your jam, place a couple drops in some ice water. If it sticks together it is done, if it falls apart in the water, keep boiling. Did I mention you will be cooking it down for a while? I guess you can over process the jam but I don't have enough experience to tell you when it gets to that point... I can tell you to expect it to still be runny. I have also read that when it coats the back of the spoon it is finished.

6. Add to sterile jars, making sure not to put the rings on too tight. This is some strawberry jam that my friend made because she had already made all her blueberry jam last week. (Same process as blueberry jam)
 
7. Place in pot and cover with enough water that the lids are covered. Bring to a boil and let boil for 10 minutes. 
8. Remove from water (this is where those tongs come in real handy). 
9. Let them sit on counter to cool. You will hear the lids popping which is a very satisfying sound!

I used about 8 lbs of blueberries and left with two pints of jam.

Look how pretty they are!
Strawberry and blueberry jam

Thursday, July 15, 2010

Cocktails and Crafts - Botanical Prints


I guess they all can't be winners...
Gigi's face pretty much sums it up.
Today's craft didn't go as planned. We were supposed to make beautiful botanical print cards. We used card stock instead of watercolor paper and ended up with pretty colored goo but nothing really identifiable as a botanical print. We will definitely give this craft another try with the proper paper.

Not to put what we had to waste - the kids got their craft on and colored.


The craft may not have turned out as expected but the cocktail was yummy!

Blueberry Mojitos!
- 1 1/2 oz light rum
- 1/4 oz fresh lime juice
- 8 mint leaves
- 8 fresh blueberries
- 1 tsp sugar
- Club soda or sparkling water
Garnish: lime slice and mint sprig

Muddle (smash) mint leaves and blueberries with sugar in a mixing glass. Add light rum, lime juice to shake with ice. Pour into a tall glass. Add more blueberries and soda. Garnish with lime slice and mint sprig.

Wednesday, July 14, 2010

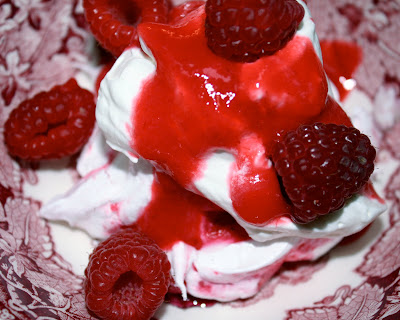
Raspberry Ripple Meringue

I picked up Everyday Foods in the checkout line and unlike Martha Stewart Living, I felt these recipes looked easy, quick and delicious. I made my first attempt at meringue this past weekend with a recipe out of the summer issue.

Not the best picture of them, but it was late and worried they wouldn't stick around long enough for a proper photograph in natural light. So here you have it.
Raspberry Ripple Meringue

Meringue is pretty easy to make and can be easily modified with the addition of fruit purees, as I soon found out. The hard part for me was knowing when they were done. The only meringue anything I have had were hard and dry. After waiting the allotted time and calling multiple family members and friends, I took them out of the oven and hoped for the best.

Anyone who knows me also knows that I LOVE sweets. I was a little skeptical when the recipe said to top with unsweetened whipped cream, but think it is best to follow a recipe for the first attempt. Add some more fruit puree and whole fruit and there you have it - Raspberry Ripple Meringue!

Hubby loved it and it definitely satisfies the sweet tooth with one serving. I made a bunch of mini servings instead of the one large one the recipe showed and they came out perfect and not dry. Glad I didn't add sugar to the whipped cream - you are so wise Martha Stewart.


Tuesday, July 6, 2010

A Rainbow Explosion

Yesterday was a busy day for my etsy store. I got final approval for a little boy's first birthday invitation and then designed labels for matching party favors, designed three proofs for my favorite five year old friend and finished up making the sleeves for 50 wedding programs.


I did design three but I am just not loving the last design yet. I was given the direction that she wanted her name, rainbows and stars. The first design fit the bill and that is what she picked.

Below are the labels. I hope the mom sends me photos of these on the bubbles. I think it is a great inexpensive favor idea.

I also got the final feedback from family and friends on my first draft of "Cocktails and Crafts" and today hope to get draft number two underway. Talk about a humbling experience! Thank you to everyone that helped me out.

Thursday, July 1, 2010

Cocktails and Crafts - Paper Cutting and Pina Coladas


Paper cutting is an art form found all over the world. The Japanese have Kirie, Indians have Sanjhi, German and Swiss have Scherenschnitte and the Polish practice the art of Wycinaki. (Thanks Wikipedia)

Paper Cutting Supplies:
Two pages of contrasting card stock paper
Fingertip craft knife
Template
Cardboard to cut on
Spray mount adhesive
Patience

When deciding on what cocktail to make I went for the alliteration and choose the Pina Colada for a nice summer afternoon.
  • 1 1/2 oz light rum
  • 2 oz cream of coconut
  • 2 oz pineapple juice
  • 1 cup crushed ice
Pour rum, cream of coconut and pineapple juice into a blender with one cup of crushed ice. Blend until smooth. Some people actually buy garnish and if that is your cup of pina colada, then go ahead and add a slice of pineapple and a maraschino cherry, and serve.

My garnish-free pina colada.


There are templates you can find free online for paper cutting, one great site I found was called Scherenschnitte. After looking at a couple I thought I would try and make my own. I found vector images online (for free), added a black border around the image and then removed the color from the main image. What we were left with were a nice outline to cut out. I had four different levels of difficulty with one being the easiest:
  1. Simple single letter monogram in a not-too fancy script
  2. Outline of a bird sitting on a wire
  3. Falling feather
  4. Koi fish
Being the gracious hostess, I allowed my guest to pick and being the over achiever she is, she of course opted for the koi fish. Ohh nelly - here we go!


I am not what you would describe as a patient person, so this craft was hard for me! I have to say that the Fiskars Fingertip Craft Knife was a must have. I picked mine up at Walmart for about $4.00. I didn't take too many close-ups because as you can see from this picture I wasn't doing too great a job staying in the lines.

After we were done cutting them out (about an hour and half later) it was time to mount them. Just a quick touch of spray mount adhesive and we were all done. To help cover up some of the less-than-perfect lines we flipped them over which is probably what you are supposed to do anyways, but at the time seemed like a stroke of genius!

Mine is the one on the black paper and my friend Sarah's is the green. As she so accurately proclaimed by the afternoon - she was born to paper cut!
I definitely would need a lot more practice on this one before really loving it, although I might try some grandkid silhouettes for Christmas.

Funny side note: When I told Kevin what the craft was for today he looked at me like I was nuts. I think he envisioned just shapes or maybe snowflakes. I am going to cut out some circle and snowflakes and show him that when he gets home and see his reaction.

Related Posts Plugin for WordPress, Blogger...